|
Conservation
Repairs
Note: this page is long and has
many images that may take a few moments to load.
Now that you have an idea of the
Trade Hardcover Edition construction, let's look at how to repair its two
most common problems: complete case-to-textblock separation and cracked
hinges (complete separation is simply the most advanced stage of cracked
hinges). Both conditions are caused by the aging and deterioration
of the binding adhesive that holds the spine lining to the crash.
The following procedures concentrate
on replacing the spine lining to crash adhesive and will produce results
that are invisible, while at the same time extending the useful life of
the book. Please note, though, that neither procedure is a complete
"cure." If the deterioration is far enough along in the spine to
produce cracked hinges or complete separation, it is safe to assume that
all of the other binding adhesive has deteriorated and will continue to
do so. Therefore, even successfully repaired books should be handled
carefully; they may be structurally and aesthetically better, but are far
from new again.
Both of the procedures are fairly
simple, but will probably require some practice to get just right.
I would recommend trying each at least once on a Trade hardcover you're
not too concerned about, so you learn the proper feel of how things should
go.
Materials
Before any repair can begin, you'll
need to assemble your materials:
-
wax paper
-
2 heavy, smooth and flat boards
-
small, clean paint brush
-
thin plastic strip: 9 inches long by
5/8" inch wide. This can be cut lengthwise from a 2 liter
soda bottle.
-
small glass bowl
-
sandpaper, 80 grit or coarser
-
small flat blade screwdriver
-
X-Acto style knife
-
2 straight 1/8 inch diameter rods, each
9 inches long, may be wood dowels, metal rod/tubing or plastic rod/tubing;
any of these can be purchased at most home improvement or hobby
stores
-
PVA adhesive - must be archival quality
(neutral pH) and be suitable for book binding (many brands actually state this on the
label); many different brands can be found at most art supply stores.
I personally recommend Jade Adhesive 403N, which can be purchased online
at University Products: Archival
Suppliers. It's somewhat expensive, but dries with a high degree of flexibility, making it perfect for the following repairs. Note: although it is
also a PVA adhesive, do not use regular white glue such as Elmer's etc.;
it is not archival quality and does not have the required flexibility.
In addition, do not use another type of adhesive, such as rubber cement;
the solvents can deteriorate the textblock and binding.
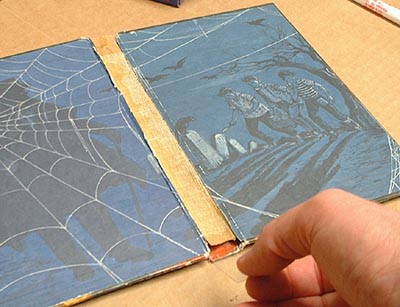
Case-to-Textblock Separation
Figures 1 and 2 show a typical complete
separation, in which the textblock has become a separate entity.
Notice the yellowing of the spine lining adhesive. As discussed in
the book construction page, this adhesive originally dried clear; the
yellowing is a result of age based embrittlement. Improper storage
can accelerate this condition, but even the most perfect storage environment
cannot fully prevent it; it is inherent to the poor quality adhesive originally
used.
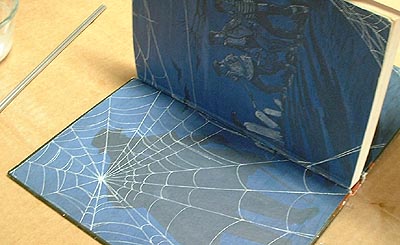
After getting your materials assembled,
the first step is to prepare the case and textblock. To prepare the
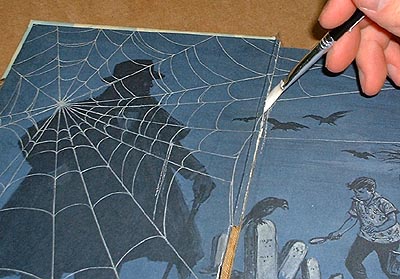
case, slide the plastic strip in between the crash (plus its backing) and
the spine inlay. See Figure 3. The purpose of this is to prevent
any adhesive from soaking through the crash and onto the spine inlay, effectively
gluing the two together. These parts must stay separated to form
the hollow space discussed in the book construction page.
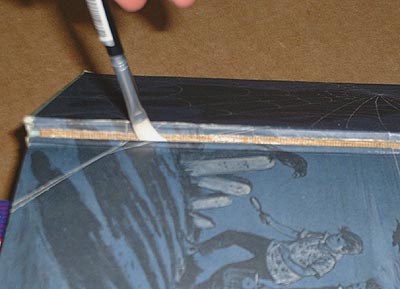
Next, to prepare the textblock, use
the sandpaper to vigorously scuff up the adhesive surface on the spine
lining. The idea is to just remove a small amount of material to allow for a better bond to the new adhesive, so be careful and don't remove too much.
After sanding, place some of the PVA adhesive into the glass dish and thin
it with a little bit of water. Only a very small amount of water
is required (just a few brushes full). The intent is to get the glue
to flow better, but not so thin that it runs too much. Per Figure
4, spread a thin layer of the thinned adhesive onto the spine lining to
soften and bond to the old adhesive below. Allow this to dry while
completing the next steps.
The next step may or may not be required, depending on the condition
of your book. Even if it is required, it may only be for one side,
as in our example. As you can seen in Figures 5 and 6, the intent
is to glue back down the inner edge of the pastedown endpaper that has
lifted up. To do so, gently brush a small amount of thinned adhesive
on the back side of the edge and push/hold it down with the small screwdriver.
Be very careful to not get any adhesive on the printed side of the endpaper
as it will show in the finished book. This takes some dexterity and
patience and the paper edge must stay down on its own (i.e. be somewhat
dry) before the next step can be performed.
Once the edge is secured, the case and textblock are ready to be reassembled.
Per Figure 7, brush a liberal amount of thinned adhesive onto the crash.
Make sure the adhesive soaks through the weave to get a good bond.
When the case is ready, carefully align the textblock and push it into
the crash. See Figure 8. The alignment here is critical; make
sure both the front and back hinges look correct. Don't be afraid
to reposition the textblock a few times if necessary, as the adhesive will
not begin to dry for several minutes.
When you are satisfied with the alignment, close the book and place
wax paper between both the front and back endpapers; the wax paper prevents
any excess adhesive from gluing the endpapers together. Make sure
the wax paper is fully inserted into the hinge. Next, put the book
flat on one board and place the 1/8" diameter rods into the joints.
Make sure the rods are placed properly; they will prevent the joints from
pushing up while the adhesive dries. See Figure 9.
When everything is in place, the final step is to put the second board
on top of the book and leave it to dry for at least 24 hours. Figure
10 shows the complete assembly from the side. Note the placement
of the rods.
Figure 11: your repaired book, with properly aligned textblock and solid
hinges! Don't forget to remove the plastic strip; just give it a
gentle tug if you meet some resistance.
Cracked Hinges
Although the book is still in one
piece, cracked hinges are actually slightly more difficult to repair than
a complete separation. With such close quarters, it is difficult
to get the adhesive into just the right places; therefore, some cutting
may even be required. The following procedure is somewhat similar
to the first one and borrows a few things from it.
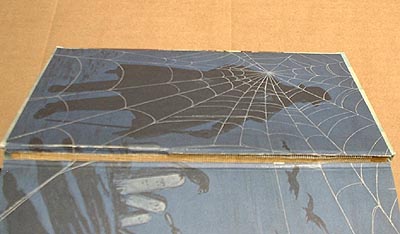
Figure 12 shows a typical cracked
front hinge, with partially separated endpapers. As you can see,
the textblock is still firmly attached to the crash, but only at the center
of it, allowing the hinge to split. Because the endpapers are only
partially separated, the attached portions will have to be separated to
complete the repair. In our example, only the front hinge is cracked.
Many books have both hinges cracked. Both may be repaired with this
procedure, but only one at a time, with the first hinge completely dry
before the second is repaired.
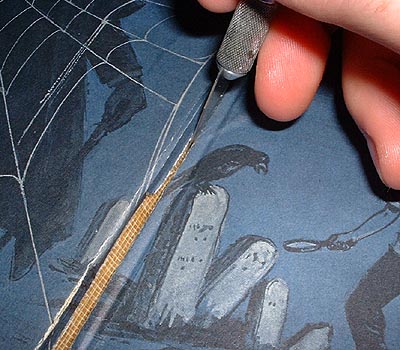
As shown in Figure 13, carefully
cut the two halves of the endpapers apart with the X-Acto knife.
You should not be cutting any paper, but simply the thin layer of adhesive
that bonds the two edges together. Therefore, very little force is
required.
With the two endpapers completely
separated, the hinge can be opened completely and repair can begin.
See Figure 14. First, however, the plastic strip must be inserted
between the crash and spine inlay, as in the first procedure.
Like the first procedure, the lifted-up
edge of the pastedown endpaper must be glued back down. Gently brush
some thinned adhesive under the paper edge and push it down with the small
screwdriver. Again, the edge must stay down on its own before
the next step can be performed. See Figure 15.
When the endpaper edge is ready,
brush a fairly liberal amount of thinned adhesive into the space between
the spine lining and crash. Be very careful to not get any adhesive
on the printed portions of the endpapers. Let me say from experience,
that this can be tough; you're typically working in very tight quarters.
See Figure 16.
When the adhesive is in place, hold
the textblock and push down and forward on the cover as shown in Figure
17. This will allow everything to line up; hold this way for about
a minute.
Next, as shown in Figure 18, put
the book on one board and place a sheet of wax paper between the endpapers
(making sure to get the edge of the wax paper all the way into the hinge).
Then, place the 1/8" diameter rods into the joints and place the second
board on top of the book.
Again, allow this assembly to dry
for 24 hours. Your cracked hinge is now repaired! Don't
forget to remove the plastic strip.
For convenience, both repair procedures
can be downloaded in printable Adode Acrobat format here: repair.pdf.
Please
contact
me with any questions or suggestions to make the procedures better.
Home << Previous | Next >> << Previous | Next >>
This page last updated on 02-Sep-03
|